Posts

Showing posts from February, 2010

Added a Taillight to the new Neckrest.

Image
T his morning I added a taillight to the right of the neckrest similar to what ICE has done to their neckrest.  I also ordered a embroidered Black Widow patch for the front of the neckrest for a little graphic zing. When the patch is in I will post photos of the completed project. Below is the rear view of the neckrest and taillight. The added light is higher than the rack mounted light so it will provide more visibility from the rear.

What did i do when I became bored?

Image
W ell this morning after digging out the driveway from all the snow and taking a hot shower and some pain killer I became bored.  I headed out to the garage to look at the trike and maybe do some routine maintenance, but I became distracted by my trike neck-rest. The neck-rest that I assembled worked fine to a extent, but lacked adjust ability.  I was hard pressed to come up with a solution. I decided to take on the task and make the headrest adjust up, down, forward and making the pad adjustable to different angles.  I used a Space-Bar to mount he cushion. First I took a piece of Aluminum and cut it to 2.5" X 3.5" and drilled two holes for the bolts that hold the clamps that hold the pad.  I then attached the two metric bolts with nuts and mounted the Space-Bar to the trike on a movable plate. Below is a photo of the completed mount.   A s you can see by the mount it is adjustable up and down and the pad can swivel to meet my neck.

Chain Tubes here but a no go

T he chain tubes came the other day, but they are over 3/4" to short. I ordered 7.5" but for some reason they were 6.75" and they expose the frame to damage. I called the vendor and they are going to redo the order.  This a a pain as I had uncoupled the chain from the master link, removed the old chain tubes and replaced with the new ones, that is when I realized the problem. I closed the Master Link and will have to start over again when they get here.  Monday UPS should deliver the handlebars, but with all this horrible stormy weather who knows. When they do get here I plan to remove the old ones and install the new ones. While I have the old one off I will strip the bar-ends off the old set and install them on the new set.  The rest I will leave to the LBS as I am still not proficient as a mechanic, and if I screw it up it will cost me more cash to correct the mess. After the work on the chain tubes I will have to give the trike a wax job as it is dirty and the shine ...

Bling for the Black Widow

Image
F or the longest time I have felt that the graphics on the Black Widow were dated and shabby looking. I also noted that they were starting to peel up at the edges and know that as soon as it was warm out they would start to peel off completely. I decided that I should change the graphics to something more refined and cool looking. The local sign maker was able to produce two logos and install them on the trike to match the Black Widow logo on the chain-stays.  Below are photos of the results of the change. I think they look cool and give the trike a special look. I found out that my replacement handlebars were shipped yesterday from Utah Trikes and will be delivered March 1st. I also was notified that the custom chain tubes being made by Terracycle were also shipped. They were shipped priority mail so they should be here in a few days. Then I will have my hands full installing those bad boys. I am expecting the replacement tubes to make a difference as the tubes I have now are no...

New Modification on my list

Image
F or a while I have been looking over a problem I have with my steering and have found a solution. I have ordered a safe replacement that will give me adjust-ability and comfort. The new handlebars will be fully adjustable for length and angle. It should also reduce the weight of the trike by a few grams. I am far from a weight weeny, but I won't complain. When I get them is when I can decide what I need to do to add my accessory bars form the old handlebar. These bars are being shipped on Monday as well as the replacement chain tubes. Below is a pretty bad photo of the handlebars.

Additional Work Performed Today

Image
T his afternoon I was just sitting and looking at my chain line and realized that my FastBack Frame pack was extremely near to the chain, and depending on what ring the chain was in would hit the pack.  After looking at the pack for a while I realized the pack was very sloppy and to darn flexible.  I decided that there has to be something I can do to correct this problem. I pondered the problem and looked around the workshop and sitting in front of me was the answer.  Of all things it was a panel from a long discarded vertical blind made of plastic. I went and took some measurements of the inside of the pack, and cut out two pieces matching the measurements I had taken.  I Laminated the two pieces together using Crazy Glue forming a rigid light weight wall. I then installed two pieces of Velcro to the back of the wall. The inside of the Frame Pack already had Velcro on the back so all I needed was the opposite side of the Velcro strip so it would mate and hold. I...

Trike Alignment

Image
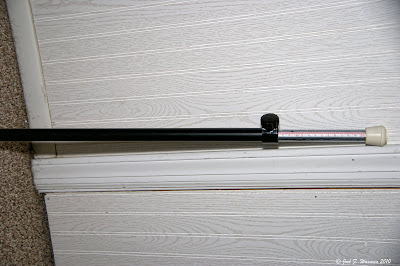
O ne of the hardest parts of owning a trike is wheel alignment. On my trike the wheels have a camber and should be parallel to each other. Other trikes the wheels might be perpendicular and must have a minimum amount of toe-in.  The basic method to align a trike like mine is to measure between the rims at the same elevation (Axel Height) at front and rear of wheel. Since my trike has the frame and other obstacles in the way another method has to be done.  The  best way was to measure the distance between the wheels at 10:00 o'clock at the rear and 2:00 o'clock at the front. Of course the tool used must be level for an accurate measurement. I built a tool a few years back and have refined it today. I added rubber caps at each end to protect the wheel and a measuring tape on the slider for better accuracy. Below are two photos showing my device.

KMC X-9 Chain installed

T his morning first thing I went to the LBS for Chris to install my KMC X-9 chain. As usual Chris and Jason great me with a smile and a hardy "Good Morning". It is always a pleasure doing business at Halters Cycles in South Brunswick New Jersey.  They are not a recumbent dealer, but their skills give them an edge. There work ethics are exemplary, and there hasn't been a problem that they haven't been able to fix. In a few minutes after getting there Chris started work on the trike and had it installed and lubricated in a very short time. It was great that it got done so quickly, but that meant I had to leave. I enjoy going to their shop just for a short chat. In the Spring and Summer they are so busy chats seem to be short, but they do have a business to run. A fter returning from the LBS I wiped down the trike and installed some SRAM cable guides on the tie-rod to hold the brake cables that seem to get in the way of the chain. I usually use a Velcro wrap, but it i...

Horn installation complete

Image
T his afternoon I purchased some Stick-On-Cable Guides and cleaned up the installation. Also this afternoon FedEX showed up with my 7 day late package which contains the X9 chain for the Black Widow. Tomorrow I will be at the bike shop at 11:00 AM sharp. I want to get the chain installed and tested.  Below is a photo of the cable guides that I used to clean up the wire line, which eliminated the Ty-Wraps around the Cross "T".

Horn on the way

Image
M y new GaleForce Blaster should be delivered today, at least I hope so. I made a mount for the horn using a bottle cage. I got the idea from Jim on the Bentrider.com forum. I modified the cage and mounted it to the boom directly in front of the cross T.   Once I have the horn I will paint the cone flat black then mount and wire it to its battery. Once I have the horn and figure out how to wire it for the best riding position I will post more photos. Cage to Hold Horn   W ell the horn arrived and I have installed it as planned. I have the button on the right hand-grip and the battery in the bag on the left Cross T. Below is the finished job. Horn in Converted Cage

Horn Update

Image
I was informed this morning that Lt. Gale has a GaleForce Blaster available for me and it will ship Saturday. It will come at just the right time as a mouse found its way into my garage and ate the wiring from the horn.  The horn is sealed so there is no way for me to get in there and solder a new lead on. It is going to take a of ingenuity to mount this horn, but I can't figure it out until I have it in my grubby little hands. T he horn comes with a handle bar mounted button and a battery box that holds the 9 Volt battery. It works with any voltage from 9-15 Volts DC. I might try to find a battery that has more voltage, but time will tell. A s you can see by the photo top left there is connectors in the wiring harness making it easy to move the horn around and take the battery box in if you want in the real cold weather to prevent battery drain. There is more than enough wire to make location of the horn a easy job no matter where I place it. I will call Lt. Gale today to ...

Long time since posting

A s some of you know I went through a rough time with severe pain in my arms and legs. I went for tests shots in the shoulders and physical therapy with no help. I kept telling the doctors it was my neck and the insurance company would not OK a spinal shot in my cervical joints. After long months of fighting them, they agreed and the pain was gone in days. Of course I was unable to ride, but i am ready to go as soon as the weather cooperates. I have ordered a new chain that should be here tomorrow and next week i will have it installed. I also contacted a company to get some handlebars more to my riding preferences. That is a bit up in the air. I will need to replace my horn, with a better on, and I will post my results when the time comes.